Graphics Programs Reference
In-Depth Information
Fixing time zone settings on your images
Most digital cameras record the time that you captured the file. The problem is that some photog-
raphers, including us, rarely take the time to change the time setting in the camera when they
travel and photograph in different time zones. Admittedly, the time stamp is more important for
some types of photographers than others. For photojournalists, it may be imperative; whereas for
family photos, it may be purely optional. However, you never know when having the information
will be useful, and Aperture makes it so easy to correct the time stamp that there's no reason not
to fix it.
To ensure that the correct time is associated
with the image, assuming that the in-camera
clock was accurately set for your home time
zone, follow these steps:
1.
Click the Import Settings button in
the upper right of the Import inter-
face and choose Time Zone.
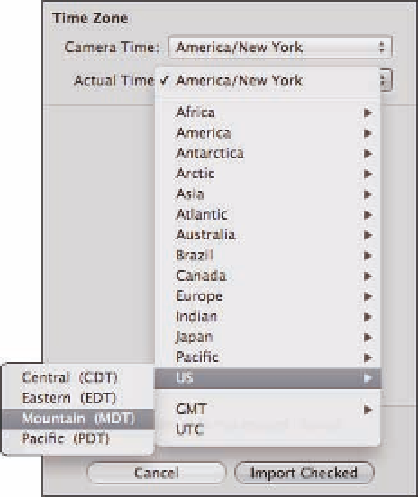
Two pop-
up menus appear, as shown in Figure
2.12.
2.
Specify the time zone the image is
currently in, which is normally your
home time zone, using the Camera
Time pop-up menu.
3.
On the Actual Time Zone pop-up
menu, choose the time zone to associ-
ate with the images.
It's that simple!
2.12
Use the Time Zone settings to correct the
time associated with the image.
An introduction to presets
You can use presets in many places in Aperture, including the Import panel, Adjustment Inspector,
the Metadata panel, and the File Naming dialog. In each case, presets enable you to apply a prede-
termined combination of settings with a single click. That saves time.
The Apple engineers have created some default presets that they think will be useful to many
photographers, but you can create your own as well, and we show you how to customize them. By
taking advantage of presets, you spend less time on the computer.


