Graphics Programs Reference
In-Depth Information
To create a custom preset, follow these steps:
1.
Select an existing preset that's closest to the preset you want to create, even if it's
just the straightforward Standard or Contact Sheets preset.
2.
Choose Duplicate Preset from the
Action pop-up menu and give the
new preset a name.
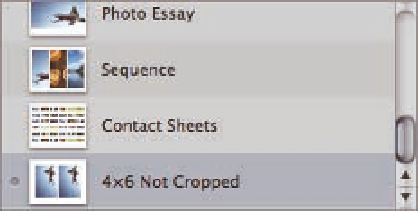
Note how
Aperture displays a dot, as shown in
Figure 7.11, to the left of the preset's
thumbnail. This dot means that the pre-
set has unsaved changes.
7.11
The small, embossed dot means that the
preset has unsaved changes.
3.
Change whatever print options you
need to change for your preset.
While
you might save certain Image
Adjustments, such as brightness, to account for how your printer prints, we recommend
not saving sharpening settings as part of a preset to avoid accidentally oversharpening
an image.
4.
Choose Save Preset from the Action pop-up menu.
5.
Click Print to print your image using this preset.
In the future, you'll be able to select
this new preset from the Custom Presets list to quickly print another image (or group of
images) with the same settings.
As you might expect, at some point if you want to remove a preset, select it and choose Delete
Preset from the Action pop-up menu.
Often, you'll change a setting in a custom preset just for a particular image or group
of images, such as adjusting a sharpening setting. You don't need to save the preset
each time you change it, unless you explicitly want to save the adjusted settings as
part of the preset.
Note
Clicking the Print button and its settings
After you set up your print (or prints) the way you want them, click Print on the bottom right.
Aperture opens the standard system Print dialog, as shown in Figure 7.12. Make sure to click the
disclosure triangle, select Color Management from the pop-up menu, and choose the appropriate
setting. Remember, if you told Aperture to manage your color (which we recommend), you select