Graphics Programs Reference
In-Depth Information
Lightroom Killer Tips
> >
look like when it is rendered at high
quality, choose Minimal instead.
▼
See How Many Images and
How Much Room They'll Take
▼
Seeing Just Your Video Clips
First choose
All Photographs
from the
path pop-up menu at the top-left side
of the Filmstrip. Then, in the Library
module go up to the Library Filter at
the top of the window (if it's not visible,
press the
\ [backslash] key
), and click
on Attribute. Over on the far-right side,
to the right of Kind, click on the Videos
button (its icon is a filmstrip and it's
the third icon from the left) and now it
displays nothing but all the video clips
you have in Lightroom (pretty handy if
you want to make a regular collection
of just your video clips).
▼
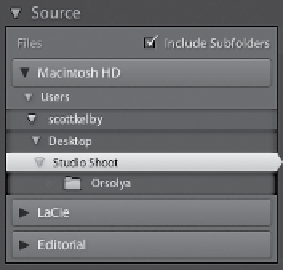
Hiding Folders You Don't Need
If you're importing photos that are
already on your computer, that long
list of folders in the Source panel can
get really long and distracting, but
now you can hide all those extra folders
you don't need to see. Once you find
the folder you're importing from, just
If you look in the bottom-left corner
of the Import window, you'll see the
total number of images you have
checked to import, along with how
much space they're going to take up
on your hard drive.
▼
Choosing Your
Preview Rendering
I ran a Lightroom preview time trial,
importing just 14 RAW images off a
memory card onto a laptop. Here's how
long it took to import them and render
their previews:
▼
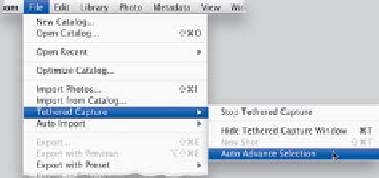
To Ad v a n ce o r N o t to Ad v a n ce
When I'm shooting tethered, as soon
as a new image comes in, I like to see
it onscreen at full size. But if you'd
prefer to control which image appears
onscreen, and for how long (remember,
if you see one onscreen you like, it
Embedded & Sidecar:
19 seconds
Minimal:
21 seconds
Standard:
1 minute, 15 seconds
1:1:
2 minutes, 14 seconds
double-click on it, and everything else
tucks away leaving just that folder
visible. Try this once and you'll use
it all the time.
You can see that the 1:1 preview took
seven times as long as Embedded &
Sidecar. That may not seem that bad
with 14 photos, but what about 140
or 340 photos? Yikes! So, armed with
that info, you can make a decision that
fits your workflow. If you're the type
of photographer that likes to zoom in
tight on each and every photo to check
focus and detail, then it might be worth
it for you to wait for the 1:1 previews to
render before working on your images.
If you're like me, and want to quickly
search through them, and just zoom in
tight on the most likely keepers (maybe
15 or 20 images from an imp or t), then
Embedded & Sidecar makes sense. If
you look at them mostly in full-screen
view (but don't zoom in really tight
that often), then Standard might work,
and if you want thumbnails that more
closely represent what your photo will
▼
If Your Nikon Won't Tether
If your Nikon camera is supported for
tethered shooting in Lightroom (like
the D90, D5000, D300, D300s, D700,
D3, D3X, and D3s thus far), but it just
doesn't work, chances are your camera's
USB settings aren't set up to work with
tethering. Go to your camera's Setup
menu, click on USB, and change the
setting to MTP/PTP.
may only stay there a moment or
two until the next shot comes in), go
under the File menu, under Tethered
Capture, and turn off
Auto Advance
Selection
. Now, you'll use the Left/
Right Arrow keys on your keyboard
to move through your images, rather
than always seeing the image you just
took onscreen.