Graphics Programs Reference
In-Depth Information
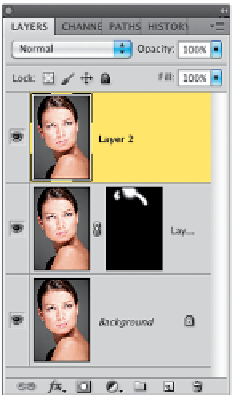
Step Nine:
Okay, let's add some highlights to her
hair. Duplicate the Background layer by
pressing
Command-J (PC: Ctrl-J)
, then
change the blend mode for this layer
from Normal to Screen. This makes the
photo really bright. Now, press-and-hold
the Option (PC: Alt) key, and click on
the Add Layer Mask icon at the bottom
of the Layers panel (shown circled in red
here) to hide this brighter layer behind a
solid black mask. Now, get the Brush tool
(B)
, choose a soft-edged brush (from the
Brush Picker up the Options Bar), set your
Foreground color to white (press the let-
ter
D
), and then paint over the highlights
already in her hair. It'll look too bright at
first, but you can control how bright they
are using the Opacity slider for this layer.
Lower it to around 60% (as shown here)
to make the highlights look more natural.
Step 10:
Next, let's get really nitpicky. There are two
wrinkles on her neck, because she's twist-
ing her head toward the camera (look back
at the image in Step Nine). Zoom in tight
so you can really see them clearly. Then
press
Command-Option-Shift-E (PC:
Ctrl-Alt-Shift- E)
to make a new layer
that is a flattened version of your image
(this leaves your other layers intact, just in
case you need to go back to them later.
We're not going to, but ya know—just in
case). Now, get the Patch tool and draw
a selection around the first wrinkle. Click
inside the selected area and drag it to
the right to an area that doesn't have a
wrinkle, then release the mouse button
and it's gone! Do both wrinkles and if
it leaves anything behind, switch to
the Healing Brush and remove anything
left over.