Graphics Programs Reference
In-Depth Information
Lightroom Killer Tips
> >
to that folder. That way, as soon as the
action is run, and the file is saved out
of Photoshop, it will automatically be
re-imported into Lightroom.
▼
Choosing the Name of Your
Photoshop Edited Files
▼
Get Rid of Those
Old PSD Files
▼
Getting Consistent Color
Between Lightroom
and Photoshop
If you upgraded from Lightroom 1,
do you remember how each time you
jumped over to Photoshop, it created a
copy of your photo and saved it along-
side the original (in PSD format), even if
you never made a single change to it in
Photoshop? If you're like me, you prob-
ably had a hundred or more PSD photos
with no visible changes, just taking up
space on your drive and in Lightroom.
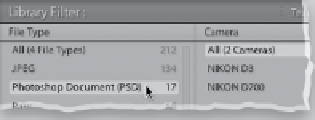
If you still haven't gotten rid of them,
go to the Library module, and in the
Catalog panel, click on All Photographs.
Then, up in the Library Filter, click on
Metadata. In the first field on the left,
click on the header and choose
File Type
from the pop-up menu. It will list how
many PSDs you have in Lightroom, and
if you click on Photoshop Document
(PSD), it will display just those files, so
you can see which ones you never used
or just flat out don't need, and you can
delete them so you get that space back.
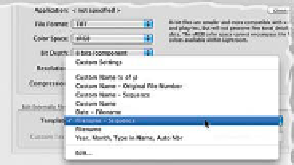
Back in Lightroom 1, it automatically
added “Edit in CS3” to end of any photo
you edited over there, but now you get
to choose exactly what these edited files
are named. Just go to Lightroom's pref-
erences (press
Command-, [comma;
PC: Ctrl-,]
), and then click on the Exter-
nal Editing tab, and at the bottom of
the dialog, you'll see the Edit Externally
File Naming section, where you can
choose your own custom name or one
of the preset file naming templates.
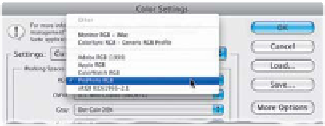
If you're going to be going back and forth
between Lightroom and Photoshop, I'm
sure you want consistency in your color
between the two programs, which is why
you might want to change your color
space in Photoshop to match Lightroom's
default color space of ProPhoto RGB.
You do this under Photoshop's Edit menu:
choose
Color Settings
, then under
Working Spaces, for RGB, choose
Pro-
Photo RGB.
If you prefer to work in the
Adobe RGB (1998) color space in Photo-
shop, then just make sure you send your
photo over to Photoshop in that color
space: go to Lightroom's Preferences
dialog, click on the External Editing tab
up top, then under Edit in Photoshop, for
Color Space, choose
AdobeRGB (1998)
.
▼
Cutting Your File's Ties
to Lightroom
▼
How to Get Photos
Back Into Lightroom After
Running an Export Action
If you created an action in Photoshop
and saved it as an export action in Light-
room (see page 259), when your photos
leave Lightroom and go to Photoshop
to run the action, that's the “end of the
line” (the photos don't come back to
Lightroom). However, if you want those
processed photos to be automatically
imported back into Lightroom, do this:
Use Lightroom's Auto Import feature
to watch a folder (see Chapter 1), and
then when you write your Photoshop
action, have it save your processed files
▼
Getting Much Better Looking
High Dynamic Range Images
Although in this chapter I showed you
how to jump from Lightroom to Photo-
shop to create High Dynamic Range (HDR)
photos, unfortunately if you're not using
Photoshop CS5, Photoshop's built-in HDR
feature isn't the greatest (and that's being
kind). Every pro photographer I know who
is into creating HDR images without CS5
uses a program called Photomatix Pro
(you can download a free trial version
from their website at
www.hdrsoft.com
).
Tr y it once, and I doubt you'll use Photo -
shop's old HDR feature again.
When you move a file over to Photo-
shop for editing, and you save that file,
the saved file comes right back to Light-
room. So, how do you break this chain?
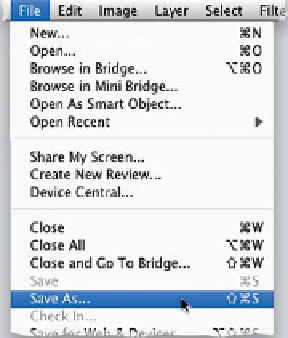
When you're done editing in Photoshop,
just go under Photoshop's File menu
and choose
Save As
, then give the file a
new name. That's it, the chain is broken
and the file won't go back to Lightroom.