Biology Reference
In-Depth Information
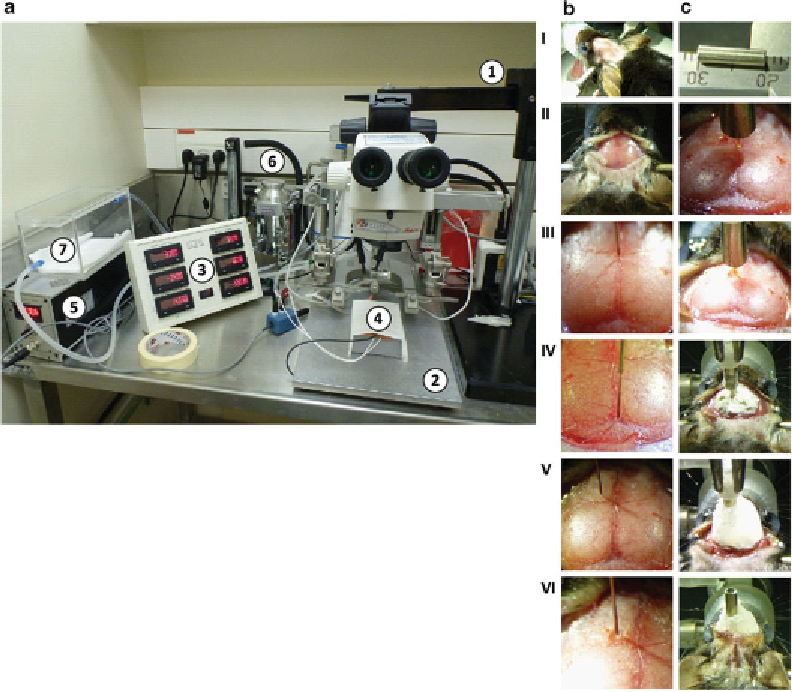
Fig. 1
Surgery setup and procedure. (
a
) Overview of the surgery setup including (
1
) stereomicroscope, (
2
) ste-
reotaxic instrument, (
3
) display of stereotaxic coordinates, (
4
) mouse stretcher with temperature controlled
heating pad, (
5
) temperature controller, (
6
) isofl urane vaporizer, (
7
) isofl urane induction box. (
b
) Major steps of
viral vector injection procedure: (
I
) head fi xation with tooth bar, face mask, and ear bars, (
II
) Scalp incision and
skull exposure using wide-tipped bulldog clamps, (
III
) axis zeroing with needle tip at bregma, (
IV
) head orienta-
tion by horizontal and vertical lambda alignment, (
V
) marking of the intended hole position, (
VI
) needle insertion
into the brain and injection. (
c
) Major steps of optical fi ber implantation: (
I
) shortening of the optical fi ber to
required length using the ear bar scale, (
II
) axis zeroing with optic fi ber tip at bregma, (
III
) placement of the optic
fi ber above the injection site, (
IV
) adhesion enhancement by application of Metabond, (
V
) fi xation of the optic
fi ber to the skull using dental acrylic, (
VI
) closing of the incision around the dental acrylic using tissue adhesive
Micro motor drill with micro burrs (0.5-0.7 mm)
1 ml syringe with needles (30G) for intraperitoneal injections
Microsyringe pump (e.g., World Precision Instruments UMP-4)
Cotton swabs, optional: absorbent swabs (Sugi)
50 ml conical tubes
Vetbond tissue adhesive or surgical suture
Search WWH ::

Custom Search