Java Reference
In-Depth Information
teleTransfer.back();
}
}
}
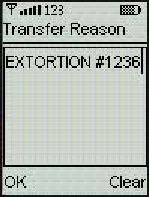
Figure 3.8
shows the
TransferReason
TextBox
.
Figure 3.8. The
TransferReason
TextBox
showing a sample transfer reason text.
TeleTransfer
with Multiple Screens
Now you have created two additional screens, but you still need to integrate them in your main
application. To do so, you need to change the
TeleTransfer
implementation somewhat. Since the
TeleTransfer
's
ChoiceGroup
for selecting the currency is replaced by the
CurrencyList
,
you do not need the
ItemStateListener
for detecting item changes any more. So you remove the
listener and also the corresponding callback method
itemStateChanged()
. To display the two
new
Screen
s
CurrencyList
and
TransferReason
, you implement the two commands
currencyCommand
and
reasonCommand
. The new commands are added to the MIDlet in the
constructor using the
addCommand()
method. In the
clear()
method, the new
TextBox
is also
cleared by calling the corresponding
setString()
method. Finally you add the
back()
method to
the
TeleTransfer
application; this method is called from the new
Screen
s to return to the main
form. The
commandAction()
method is extended to handle the new commands, displaying the new
application.
Listing 3.1
TeleTransfer.java
—The Complete
TeleTransfer
Sample Source Code
import javax.microedition.midlet.*;
import javax.microedition.lcdui.*;
class CurrencyList extends List implements CommandListener {
TeleTransfer teleTransfer;
static final String [] CURRENCY_NAMES = {"Dollar", "Euro",
"Yen"} ;
static final String [] CURRENCY_FRACTIONS = {"Cent", "Cent",
"Sen"} ;
public CurrencyList (TeleTransfer teletransfer) {
super ("Select Currency", Choice.IMPLICIT);
this.teleTransfer = teletransfer;
try {
append ("USD", Image.createImage ("/Dollar.png"));
append ("EUR", Image.createImage ("/Euro.png"));
append ("JPY", Image.createImage ("/Yen.png"));
}

Search WWH ::

Custom Search