Agriculture Reference
In-Depth Information
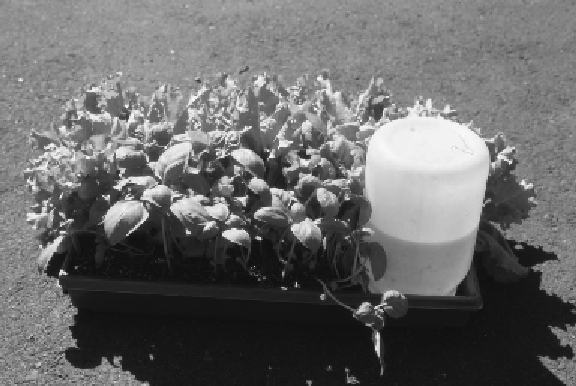
FIGURE 1.4
Inverted bottle in a nursery tray system for growing herbs and
lettuce.
aquarium pump forced air from the smaller tube into the larger one, the
nutrient solution would be sucked into the tube together with the air bub-
bles. The solution with the air bubbles would rise in the larger tube to the
surface of the growing tray where the tube was perforated to permit the
nutrient solution to escape along with the air. The nutrient solution perco-
lates through the medium and back to the reservoir underneath through the
perforated bottom of the growing tray.
Perhaps one of the simplest hydroponic systems is the inverted bottle in
a tray (Figure 1.4). For the solution tray use a plastic flat of 10½ × 21 inches
that has no holes. Place a bedding tray of 24 or 36 compartments in the flat,
but remove one corner of the filler tray to allow room for placement of a
1-gallon plastic jar. It must have a large plastic lid. Drill a ½-inch diameter
hole in the middle of the large cap and glue a split cork ring of 3 inches in
diameter on the cap. The small gap will allow the flow of nutrients from
the bottle into the tray as the plants take up the solution. The bottle is
inverted in the bottom of the tray. As solution flows to the plants, the level
is maintained by air entering the bottle through the hole in the lid permit-
ting a small amount of solution to flow from the bottle.
Use vermiculite or perlite as a substrate. You can seed directly into
the medium. Water the seeds for several days until germination occurs
before placing the inverted solution reservoir in the tray. You can cover
the tray with plastic for several days until germination starts, then imme-
diately remove the plastic or the seedlings will get long and leggy from
excess heat. This tray is good for baby lettuce and herbs, or a combination