Graphics Programs Reference
In-Depth Information
FigUre 12.9
Room schedule
7.
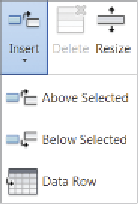
Now add a header to the four wall finish columns so you can visually
group them. Click in the <Room Schedule> field (the brackets denote
that this text is reporting the View Name parameter value). Find the
Rows panel on the ribbon. Click Insert
➣
Below Selected. Notice that
you now have a row of headers corresponding to the columns below
(Figure 12.10).
FigUre 12.10
New row inserted
8.
Hold down the Shift key, and click the four cells that are directly
above the D, E, F, and G columns. With the four columns selected,
click the Merge Unmerge button in the Titles & Headers panel of the
ribbon. This gives you one large cell. Now type
Wall Finishes
into this
cell. Select the cells above A, B, and C using the Shift key to select
them all, and then click Merge Unmerge; name this header
Room
Information
. Merge the cells above columns H and I as well, and
name this header
Area
.
9.
You can add data about the room elements while in the schedule view
(Figure 12.11). This is quite a bit easier than selecting the room ele-
ments individually in a floor plan and inputting data about the wall
finishes. Click into the cell for the Living Room, North Wall, and type
in
Beige Paint
. When you click into another cell of the same col-
umn, you can choose the previous text from the drop-down. You can
change all of the cells to Beige Paint if you like.


Search WWH ::

Custom Search