Graphics Programs Reference
In-Depth Information
In the following exercise you will assign model elements to worksets and
adjust the workset visibility settings of the view.
exercise 10.3: assign elements to Worksets and
Control Visibility
To begin, make sure that you've downloaded the file
c10-ex-10.3start.rvt
,
but don't open it just yet.
1.
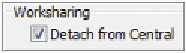
From the Revit Application menu click Open, browse to
c10-ex-
10.3start.rvt
, and select the file. Check Detach From Central and
click Open. This will allow you to open an existing Central Model to
resave it in a new location.
2.
When the Detach Model From Central dialog displays, choose Detach
And Preserve Worksets. This will preserve all worksets in the model.
After the model opens, click the Save button and save as
c10-ex-
10.3start.rvt
. If you're saving the file in the same location as the
original model, when prompted that the workset file already exists,
click Yes.
3.
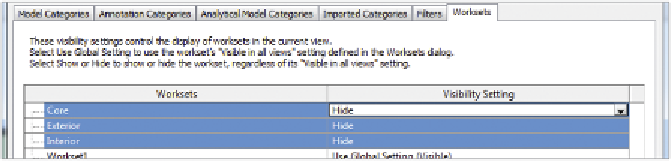
The model should open the Level 1 floor plan view. Open the
Visibility/Graphic Overrides dialog box for the view (keyboard short-
cut
VG
) and click the Worksets tab. Change the Visibility setting for
the Core, Exterior, and Interior worksets to Hide (Figure 10.8). Click
OK to close the dialog.
Figure 10.8
Workset Visibility setting
4.
Window-select the elements shown in Figure 10.9. While the ele-
ments are selected, click the Filter tool from the Selection contextual
panel. Uncheck Room Tags and click OK to close the Filter dialog
(Figure 10.9).


Search WWH ::

Custom Search