Graphics Reference
In-Depth Information
•
Negative Axis
flips the axis so that it faces backward along the path.
•
Local Up Vector
causes the alignment to be relative to the curve layer. (This takes effect if the
mesh item containing the curve has been rotated.) Note this is not often used in simple path anim-
ations.
•
Up Vector
presents a set of fields that defines the upward direction of the path alignment.
Changing the value for the axis that is horizontally perpendicular to the axis will change the bank
of the attached item. This item is also not used frequently in simple animations.
There are several ways to attach the camera to the locator. Create a new camera to start off this section.
The simplest way to attach the camera is to drag the Camera item onto the locator. This creates a hard link
between the two objects and links both the position and the rotation. Changing the Axis on the path to X and
turning on Negative Axis will cause the new camera to point toward the center of the path (and the subject).
Scrubbing the timeline will show an animation in which the camera moves around the bottle and tilts as the
path moves up and down. Adjusting (and keyframing) the roll can keep the bottle in view, but the tilt on
the camera remains, making this a bit awkward for our purposes.
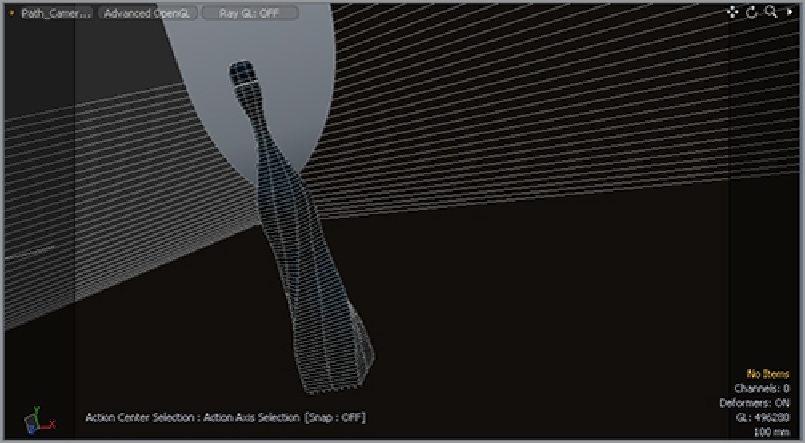
Figure 13-23
shows this camera move at
frame 45 of the animation. To get a better result, you will use another type of animation constraint that will
offer more options.
Figure 13-23:
The hard-linked camera and locator cause some tilts in the camera, which make it awkward
for this use.
Making two constraints will allow you to create a more flowing and natural camera move. To set up the
first constraint:
1.
Select the camera and drag it out of the locator.
2.
Shift+click on the locator.
3.
Go to the Animate tab.
4.
Select the Modifiers section.
5.
Under Constraints, click Position.