Graphics Reference
In-Depth Information
places. This is a sure method for creating jerky, unnatural, and rough-looking animations. Start with the first
and last frames and then add frames in the middle as needed to get the right camera motion without unne-
cessary work or roughness. Some animations will require more adjusting than simple keyframes can easily
handle, and that is where editing the space between keyframes becomes necessary.
Using the Graph Editor
Keyframes really represent only a part of the story of an animated sequence. A process commonly known as
tweening
creates the rest of the frames. This terminology comes from traditional animation, when keyframes
were created to rough out and time the motion and then (after approval) additional frames were created to
fill the space between the keys. The computer now handles this process, and this fact allows the animator
(you) to have more-direct control of the tweening process. The motion between keyframes can be linear,
eased in, eased out, or a combination. In addition, the amount of easing can be defined precisely through the
editing of a graph of each attribute. By default, the keyframes will automatically ease in and ease out.
To start looking at this aspect of animation, let's consider the animation graph for the turntable locator.
Select the locator in the Items list and then bring up the Graph Editor, which is located both in the bottom
of the Animate tab to the right of the Options button and at the top of the Options pop-up itself. When an
item is selected, a graph showing the animated attributes for that object appears, as shown in the graph of
the turntable locator in
Figure 13-11
.
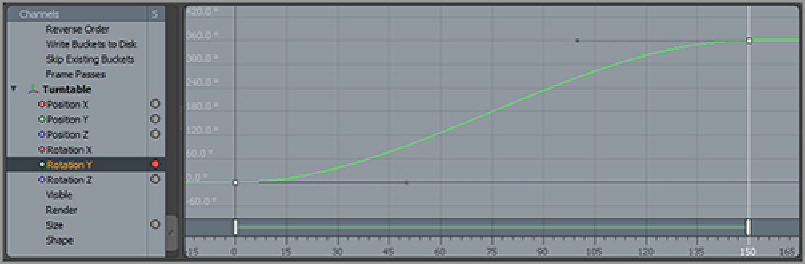
Figure 13-11:
The animation graph for the turntable locator
As you can see from this example, the ease-in and ease-out is very pronounced. The graph represents
the y-axis rotation over the course of the animation. In order to make a continuous turntable that could be
looped repeatedly, the easing needs to be eliminated:
1.
Select the first keyframe and right-click to reveal options.
2.
Under Incoming Slope, choose Linear Out.
3.
Then select the second keyframe, and for the Incoming Slope choose Linear Out. The resulting graph
will look like
Figure 13-12
.
Figure 13-12:
With both incoming and outgoing tangents adjusted to be linear, the animation will play
seamlessly.