Graphics Programs Reference
In-Depth Information
6.
Of course, the filter has been applied to the whole image so everything looks darker. The sliders in the
BPR Filters subpalette control how the filter is applied to the image. Set the Mask slider to -1. The Mask
slider bases the filter on the alpha of the model. Setting this to a negative value means that the background
is filtered while the model remains unaffected. Setting the Mask slider to a positive value reverses this.
7.
Turn on the F2 button and set the filter to Saturation. Set the Strength slider to -0.5. This takes some
of the color out of the image (a positive value makes the colors in the image more vibrant). Now set the
Depth slider to 1. This means that the filter is applied based on depth information so that those parts of
the model closer to the font receive less of the filter. Now the Enforcer has a bit more color on the closer
parts, which helps to increase the sense of depth in the composition.
8.
Turn on the F3 filter and set the filter type to Green. Set Strength to 1. Click on the Blend Mode button
and choose Screen from the list. A green color is applied over the model. We want this color to appear
only as a very subtle shade to the occluded and shadowed parts of the model. Green complements the
warm colors of the image and, by using it in the shadowed areas, the shadows will appear less saturated,
making the image a little more realistic. Set Shadow to 0.24 and Ao to 0.5. The Ao slider only works when
you render the image with ambient occlusion activated.
9.
Turn on F4 and set the filter to Fade. The model suddenly looks transparent! The Fade slider blends
the model with the background. Set the Fresnel slider to 0.9. This means that the filter is applied to the
edges of the model that face away from the viewing angle. Set the Strength slider to 0.15. This makes the
effect very subtle. By adding a subtle fade to the edges on the model, you can cheat the look of making
the subject more integrated with the background.
10.
Turn on the F5 filter. Set the filter to Noise and the blend mode to Add. Set the Radius to 1. This
increases the size of the noise grain a little. Set the Depth slider to -0.35 so the effect is stronger at the
front of the image. Set the Strength slider to 0.05. Set the Int slider at the bottom to 20 so that the filter
is applied based on the intensity of the image. These settings help add a bloom to the highlights in the
image, which helps with the contrast, making it look a little more photographic.
11.
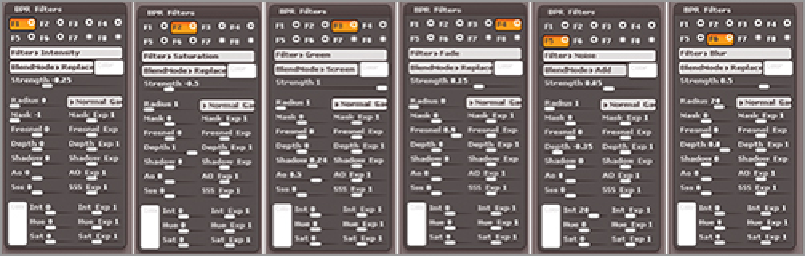
Finally, add some blurring to increase the depth of field. Turn on the F6 filter, set the filter to Blur,
and the Radius to 20. Set the Depth slider to 0.8 and the Strength to 0.5.
Figure 10-45
shows the settings I
used for each filter.
12.
You can go back and make adjustments to the other filters or add more filters as needed. You can
tweak until you are absolutely satisfied with the image. Experiment using the other filter modifiers, such
as Saturation (Sat), SSS (subsurface scattering), and Hue. The Exponent sliders let you adjust the falloff
of the effect.
Figure 10-46
shows the render with the filters applied.
Figure 10-45:
The settings for each filter
Search WWH ::

Custom Search