Hardware Reference
In-Depth Information
absolutely do not recommend this procedure because it can actually result in an explosion!
Many motherboards, adapter cards, and other circuit boards have built-in lithium or NiCad
batteries. These batteries react violently (overheating and possibly exploding) when they are
shorted out, which is exactly what you would be doing by placing such a board on a piece of
aluminum foil. Because you will not always be able to tell whether a board has a battery built
in to it somewhere, the safest practice is to never place a board on any conductive metal
surface.
Recording Physical Configuration
While you are assembling a system, you should record all the physical settings and configurations of
each component, including jumper and switch settings, cable orientations and placement, ground wire
locations, and even adapter board placement. Keep a notebook and a digital camera with a
macro/close-up setting handy for recording these items, and write down all the settings. Refer to
Chapter 4
for more information on motherboard connector, jumper, and other component locations.
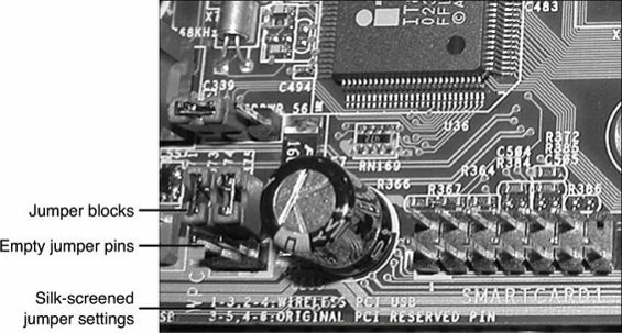
Figure 19.3
shows a typical motherboard jumper.
Figure 19.3. The jumper position shown here is used to configure the motherboard's PCI and
USB interface.
Installing the CPU and Heatsink
Before you install your new motherboard, you should install the processor and memory. This usually
is much easier to do before the board is installed in the chassis. Some motherboards have jumpers
that control both the CPU speed and the voltage supplied to it. If these are set incorrectly, the system
might not operate, might operate erratically, or might even damage the CPU. Modern boards control
voltages either automatically or via the BIOS setup program. If you have questions about the proper
settings, check the board and processor documentation.
See the
Chapter 3
section, “
CPU Operating Voltages
,”
p.
87
.
All processors today run hot enough to require some form of heatsink to dissipate heat from the
processor. To install the processor and heatsink, use the following procedure:
1.
Prep the motherboard. Take the new motherboard out of the antistatic bag it was supplied in