Hardware Reference
In-Depth Information
Some unique ones are as follows:
•
Toshiba notebook/laptop
—Press Esc while powering on the system; then press F1 when
prompted.
•
Older Phoenix BIOS
—Boot to a safe-mode DOS command prompt, and then press
Ctrl+Alt+Esc or Ctrl+Alt+S.
•
Compaq
—Press F10 during POST.
After you are at the BIOS Setup main screen, you'll usually find a main menu allowing access to other
menus and menus of different sections or screens. In the following sections, I go through the menus
and submenus found on most Intel motherboards. Although not all motherboards have all of these
settings, and other brands may use slightly different settings and terminology, most will be similar in
content.
BIOS Setup Menus
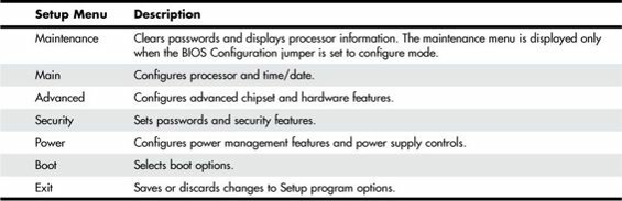
Most modern BIOSs offer a menu bar at the top of the screen when you're in the BIOS Setup that
controls navigation through the various primary menus. A typical menu bar offers the choices shown
Table 5.3. BIOS Setup Menus
Note
The settings covered here help you get a general idea of the type of settings to expect and how
the BIOS Setup settings affect your computer. Note, however, that the specific settings you see,
their locations, and even the menu titles can vary by the specific motherboard make, model, and
BIOS revision.
Choosing each of these selections takes you to another menu with more choices.
Maintenance Menu
The Maintenance menu is a special menu for setting the processor speed and clearing the setup
passwords. Older motherboards used jumpers to configure the processor bus speed (motherboard
speed) and processor multiplier. Most newer boards from Intel and others now offer this control via
the BIOS Setup rather than moving jumpers. In the case of Intel, one jumper still remains on the board,
called the
configuration jumper
, and it must be set to Configure mode for the Maintenance menu to be
available.
Setup displays this menu only if the system is set in Configure mode. To set Configure mode, power